
Pedra Da Gavea
One glimpse at the photos of Pedra Da Gavea will get your heart racing and peak your excitement all at the same time. Known as the world’s largest coastline monolith, Pedra Da Gavea is a hikers dream. It is a challenge to summit, it is a vista that overlooks the coastline and city, and it is an unrivaled photo opportunity: the perfect combination. The moment we started our Rio De Janeiro trip planning, Pedra Da Gavea was at the top of my “Must Do” list. So, how do you hike Pedra Da Gavea?
Cliff Notes
- Distance: 3.1 miles out and back
- Elevation Gain: 2,480 feet (summit is at 2,769 feet)
- Difficulty: Challenging
- Time Required: 4-6 Hours
- Access: Gates open at 8am, close at 6pm. No hikers can start after 2pm.
- Trail: Carrasqueira (Alt Trail: Pico dos 4)
Getting to the Trail
Our hiking experience to Pedra Da Gavea started with a guide. We had used a guide the day before to hike Dois Irmaos (Two Brothers) and felt much safer with one than without, so we decided to use a guide once again for Pedra Da Gavea. {Click here for our blog on whether you need a guide for Pedra Da Gavea}.
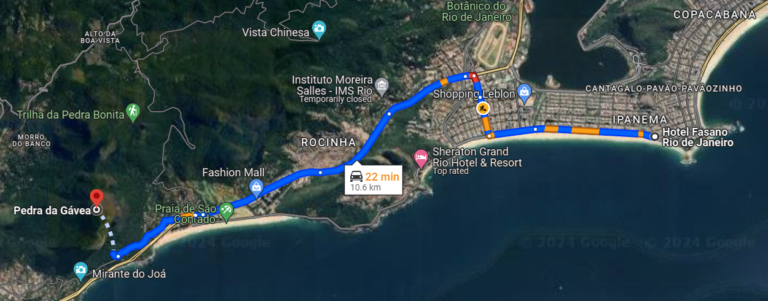
Bright and early, our guide picked us up and drove us 30 minutes outside of the Ipanema and Copacabana beach area to the small parking lot located at the trailhead of Pedra Da Gavea. Parking was very limited on the morning we arrived. We were fortunate to get a spot – but we would likely Uber if we were to do it again. We are not sure what the options would have been had the lot been completely full.
The Hike
Easy Section
The trail starts at the top right corner of the parking lot, through a metal gate, as you enter the Tijuca Rainforest. A park ranger will be sitting at a small hut to the right for you to sign-in. There is no cost of admission, but the Tijuca Rainforest tracks and limits the number of guests that come in and out daily. Simply write your name and be on your way.
The first section of the Pedra Da Gavea hike is via a cobblestone walkway, very wide, and beautiful. It quickly becomes much more narrow, predominantly dirt, and full of switchbacks. It is very common to see and hear monkeys in the trees early on in the hike – a very rewarding site. Stop, take a chance to watch them play, then continue on your way. We suggest keeping a pretty efficient pace through this first section of the hike so that you can assure yourself as one of the first hikers to the few bottle necks you will encounter throughout the day – especially at the rope and harness portion. You will also have a chance to see and take photos at these spots on your way back down.


Submerged in the rainforest, the cool and damp climate is a great plus for such a strenuous hike. Once you have hiked for about 30 to 45 minutes, you will come upon a large rock slab. This will be the first slightly technical part of the hike. The rock is not very steep, but would be difficult to climb unassisted. Fortunately, there are permanent metal chains and metal steps inserted into the rock to help you make your way up. From here it is roughly another 30 minutes to the base of the large rock face visible all across Rio. Grab a snack, take a brief break and enjoy the beautiful view from this vantage point. The hike is full of beautiful overlooks, but this is one of the earliest signs of the breathtaking view that is to come.
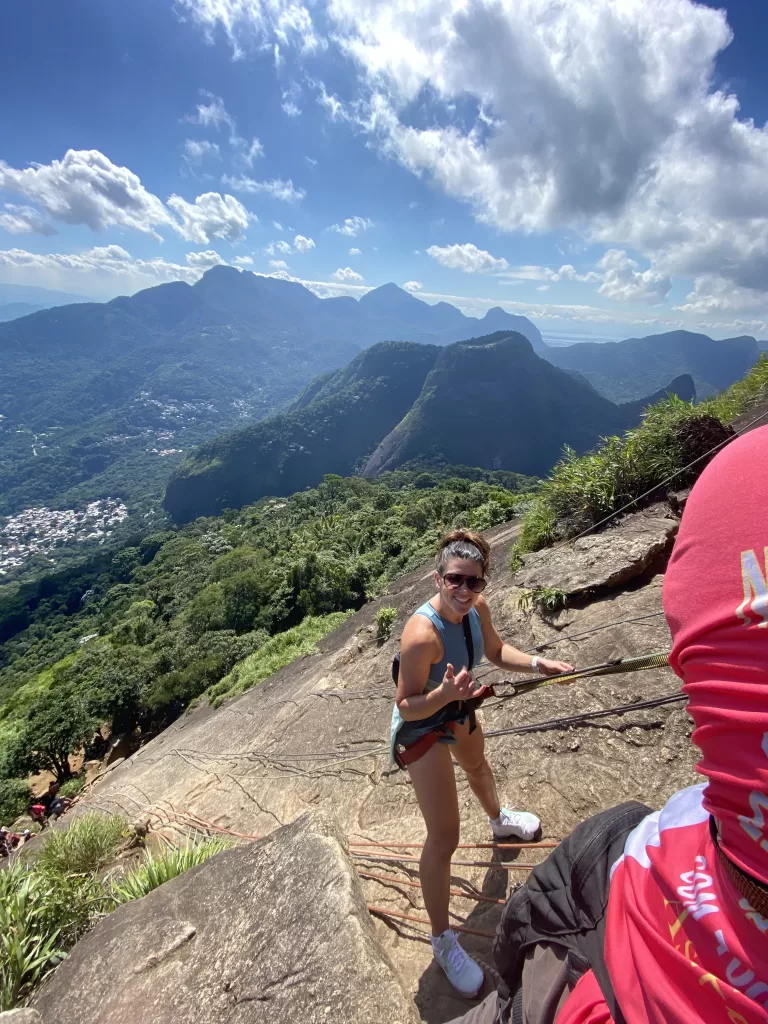
Rope Section
Another five minutes of hiking down the trail and you will reach the most technical part of the entire hike: the ropes and harness section. This area is passable with or without ropes, however we highly recommend utilizing ropes for your safety. If you choose to challenge yourself without the assistance of a rope and harness, keep going around the rock face a little further and you will find the steep and narrow passage to the left known as the Carrasqueira. We, on the other hand, opted for the much safer route. We paid the locals, they supplied and fitted us with harnesses and hooked us into their ropes for a small fee (15 Brazilian Reals per person). This section will definitely peak your anxiety and your heart rate, but it is the most rewarding and fear overcoming section of the entire hike. Once safely on top you will not believe the view as you look down over Tijuca Beach in the distance. If you’re confident enough and have a friend or someone you know with you, the photo with the view of the backdrop, while tethered into the rope, is likely the best photo you can capture.


Reaching the Top
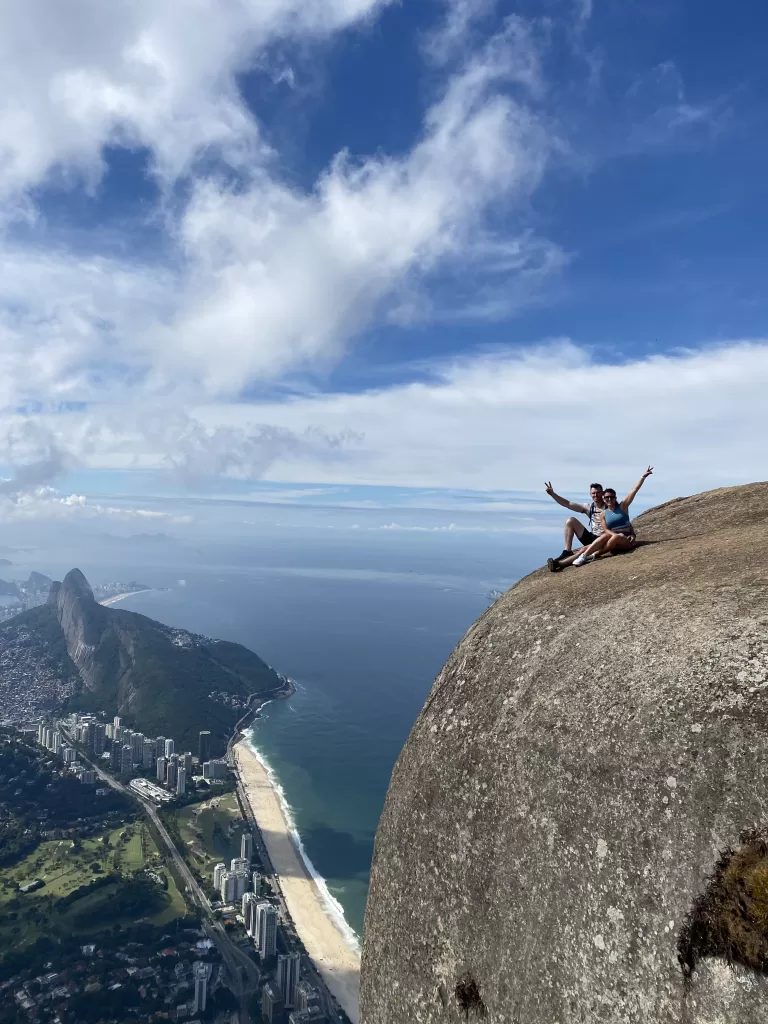
From this point, 30 more minutes of hiking and you will have reached the top. I cannot begin to explain the surreal feeling when you take your first steps on the plateau at the top and walk the grassy pathway to the edge overlooking all of Rio. The view is unmatched: Dois Irmaos, Sugarloaf, Christ The Redeemer, all below you in the distance.
Take in the view, grab a snack, then scope out your best photo opportunities. In our opinion, the best photo spot is a little risky so we wouldn’t suggest trying it. However, if you’re feeling adventurous and know your limitations, it is a photo that is hard to pass up. The best spot is to the left of the peak, where you can capture the extent of the sheer drop from the edge of the world’s largest coastal monolith. Stay far enough away to insure your safety, but have a seat, have a friend step back and capture the beauty of Rio in the backdrop and the suspense of the sheer drop of next to you.


Extra Credit Hike
If you care to continue to challenge yourself and hike further, there is a section a little higher that is actually the highest point of Pedra Da Gavea. It is back in the direction you came from when you first reached the plateau on top. We ventured that way out of curiosity and because we were wanted to see the view from the absolute top. I will warn you, it is slightly more challenging than most of the other hike. There are three pretty risky and technical portions to the section. There is a 7 feet tall vertical rock slab you must go up and down via a chain, a very narrow, but blind, crevasse to go through, even a small gap you may have to jump. If you are up to the challenge and have some supportive friends with you, then feel free. You will reach a point with a complete 360 degree view of the entire landscape that will make the risk worth the reward.


The Descent
When including the additional hike to the absolute peak, a snack, and many photos, we spent approximately 45 minutes on the top of Pedra Da Gavea before heading back down. The descent is where you can expect your pace to truly slow. With the ascending hikers and the many narrow portions of the trail you will find yourself waiting quite a bit. When you reach the top of the rope and harness section, the wait-time will include hikers being hooked in at the top, climbing down, unhooking, hooking into another hiker, then that hiker coming up and being unhooked. I would expect to wait here for 20 minutes before you’re able to strap in and rappel down.
Beyond this portion the path is more wide and less congested so you can expect to return to your comfortable pace. Enjoy your hike down, appreciate the jack fruit everywhere, and maybe a monkey or two.
Considering others hikes while in Rio? Click here for our guide to hiking Dois Irmaos (Two Brothers)!