
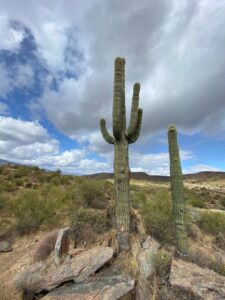
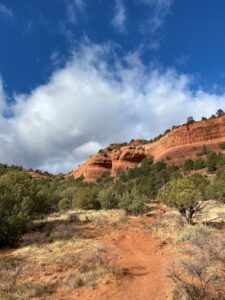
You’ll start off on your 5 day Sedona itinerary by flying into Phoenix Sky Harbor Airport (PHX), renting a car, and heading straight to Sedona. The drive will take you about two hours, but it is one of the more pleasant airport to lodge drives you’ll experience. First off, you start in the city of Phoenix, drive up a somewhat poorly maintained highway, but then all of a sudden you are surrounded by cacti EVERYWHERE. Enjoy them, you won’t find any in Sedona. Once the cacti start to fade and the landscape starts to change, you are nearing your final destination. Believe me when I say, you will know when you have arrived in Sedona. It is as if you turn the corner and the landscape turns from desert land to immaculate red rocks.
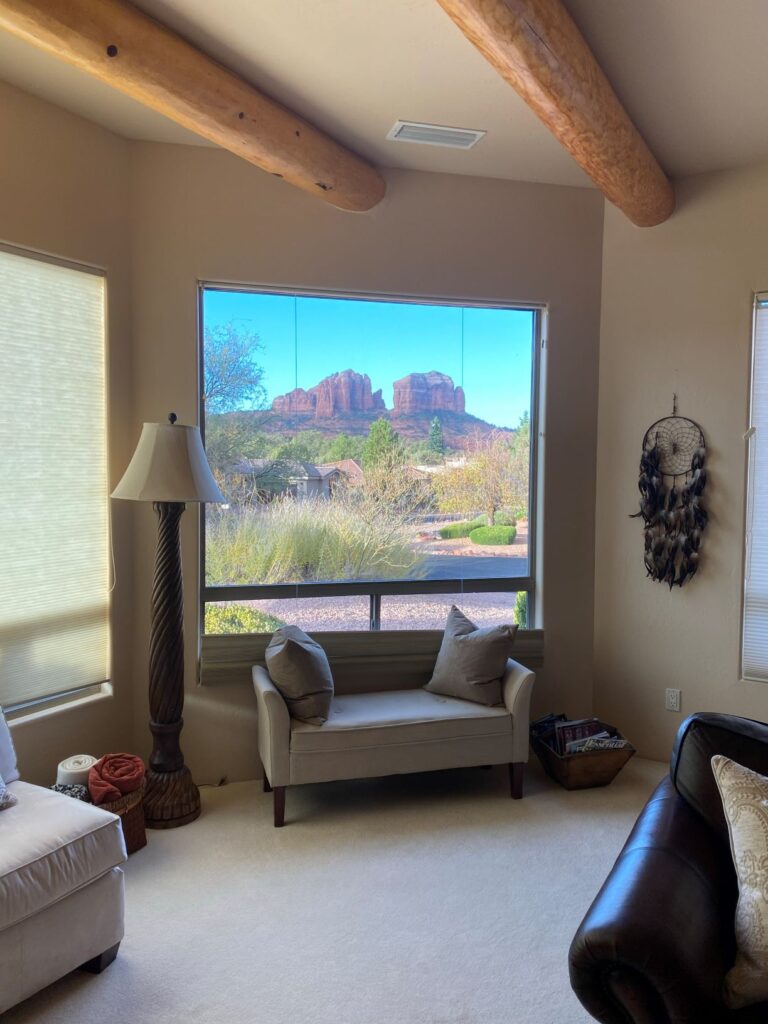
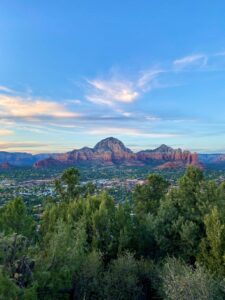
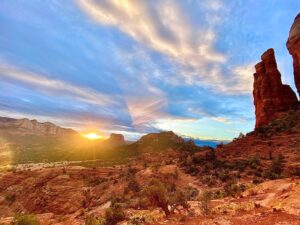
Pending what time you arrive, there may not be much daylight left to experience Sedona on your first night. We decided to check into our AirBnB, get acclimated, and head to the Airport Mesa (small airport in Sedona) for the sunset. No matter where you search online or try to drive/hike, the Airport Mesa has the best sunsets in Sedona. Word of caution: everyone else knows this too, so it can get somewhat crowded on a clear evening. You will have to pay a couple dollars to park, but then it is only a 40 yard walk to the lookout. The views are endless and fortunately expansive enough that no one is able to block them. Many even bring lawn chairs, dinner, and blankets!
Before or after the sunset, stop by the grocery store to stock up for the grocery essentials for the many hikes ahead.
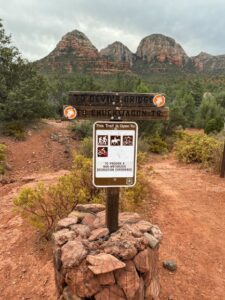
The first full day is reserved for the BEST Sedona hikes – Devil’s Bridge Hike and Cathedral Rock.
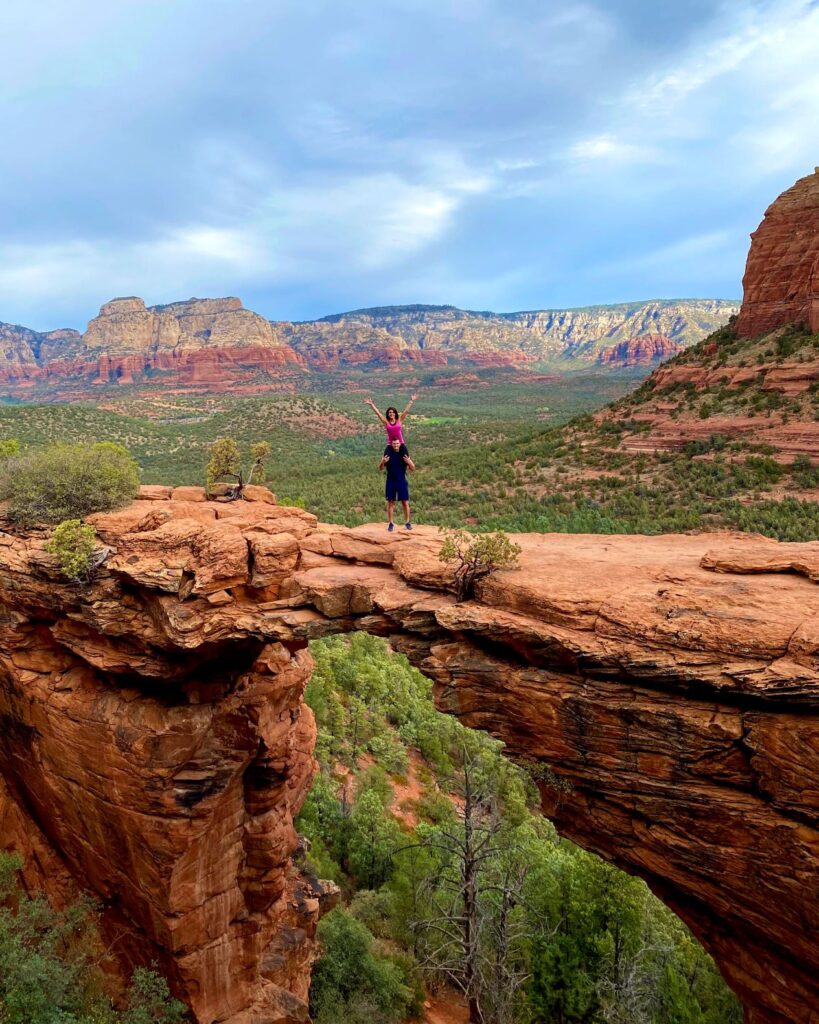
Start your morning with the Devil’s Bridge Hike. The hike to Devil’s Bridge is 4 miles total round trip (2 miles out and 2 miles back) and should take about 40 minutes each direction, not accounting for the time spent at the bridge. The hike is relatively easy (and open with wide trails) until the last 0.25 miles when it starts to get more steep and challenging. Since the Devils Bridge is such a Sedona icon, it is known to get very crowded and incur hour long wait times once you arrive at the photo spot. To beat the crowds, get a sunrise (or earlier) start and plan to do this hike on a weekday (Friday or Monday for a long weekend trip).
Click here to find a map and more detail on how to hike Devils Bridge!
There is a parking lot named Devils Bridge Trail Parking Lot, but it can get very crowded and the first part of the hike from there is on a gravel road (not as enjoyable). For better views and less traffic (with the same total 4 miles hiking distance), park at the Mescal Trailhead parking lot on Long Canyon Road here. Follow the Mescal Trail to Chuckwagon trail, then turn to the left onto Chuckwagon Trail (it goes both ways, but you go left). Continue on Chuckwagon trail for 0.8 miles (or about 15-18 minutes) until you run into Devils Bridge Trail on the right, take it (this is when you will merge with the people that took the gravel road from Devils Bridge Parking Lot). Continue on Devils Bridge Trail for 1 mile (about 25 minutes) until you reach your destination on the left.
There will likely (definitely) be a line when you get to the bridge – it is worth it to wait to get your picture on the bridge! Bring lots of water as you will be standing in the direct sun waiting.
(Word of advice: if you or someone in your group is willing to stand at the location where the photographers take the photos and take photos for everyone, you can speed the line up tremendously. That way there will always be someone walking onto the bridge as others walk off- you’ll see what I mean when you get there)
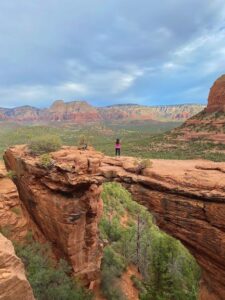
Fun fact: Although Devils Bridge is over 50 feet high with drop-offs on each side, it is 5 feet wide at its narrowest. So, if you can walk down a hallway (4 feet wide) without bumping into the walls, chances are good Devils Bridge won’t be a problem for you. It is actually more unnerving looking at it while waiting in line than it is walking on it.
Once you have taken in the views and have perfected every pose possible on Devils Bridge, it is time to take the hike back down. Prepare to stop and take in the breathtaking views on your way, they are endless.
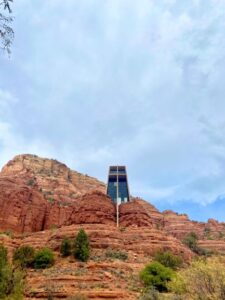
After your hike, head back to your lodging of choice, rest and eat lunch before driving to the Chapel of the Holy Cross to see this neat church built into the side of the red rocks. There is plenty of parking up on top of the hill at the entrance, and down below looking up. You shouldn’t need to set aside more than 30 minutes for here.
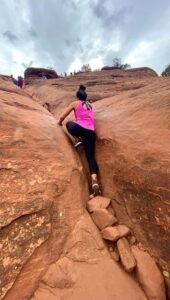
With your hiking clothes & shoes still in tow, now it is time for arguably the best hike in Sedona – Cathedral Rock. Cathedral rock is a 2.4 mile (1.2 mile out and 1.2 mile back) trail that will take approximately 45 minutes to an hour for each direction. Let me be the first to warn you, this hike is tough – but it is SO worth it. There are large elevation changes to this hike and you won’t be able to complete it without putting your hands on the ground and scrambling a little. Fortunately, there are great flat area stopping points with panoramic views periodically all the way up. Take as many breaks as you need on the way to the top, just don’t quit the hike.
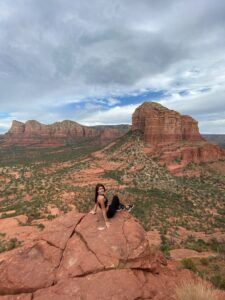
When you make it to the top, you will see a clear sign that says “End Of Trail”. Trust me, you will be so relieved to finally see it. At the top, take in the views in all directions. It is truly spectacular. Once you have caught your breath, go to the right for a quick photo op at the edge of the red rock overhang.
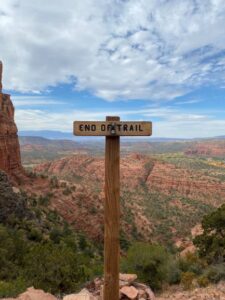
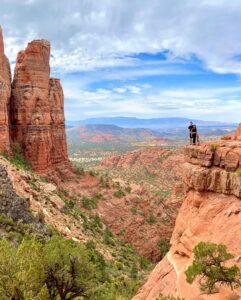
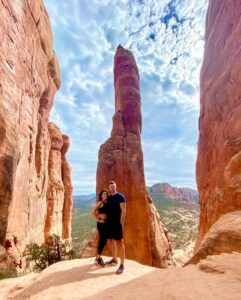
Despite what the “End Of Trail” sign says, there is still further to go. Head straight from the overhang, back toward and past the “End Of Trail’ sign and walk along the right edge of Cathedral Rock (see photo below). This will lead you to an additional steeper trail that will lead to the iconic needle. The space at the base of the needle is limited, so you may have to take turns, but the views in each direction are equally breathtaking.
After the Devil’s Bridge Hike and conquering the Cathedral Rock Hike, your legs will be ready to call it a day. Head back & freshen up before driving to Lovers Knoll Lookout for the sunset. This sunset will likely not be as good as the Airport Mesa, but will provide a different perspective and less crowds in red rock country.
You’re now at the midpoint of your 5 day Sedona itinerary and there is still so much to see! Be a sunrise chaser today & head back to Cathedral Rock for a sunrise climb. (Our Airbnb was 2 minutes from the parking lot of the Cathedral Rock climb, so it was very convenient!) TOTALLY WORTH IT! The views of the sun coming up and hitting the red rocks with these views are indescribable (not to mention hiking in the dark is quite exhilarating). Unless you truly want to climb to the top again, you can stop three-fourths of the way up. The best views come from one of the two or three landing areas. The sun should rise to your right in the direction of Courthouse Butte.
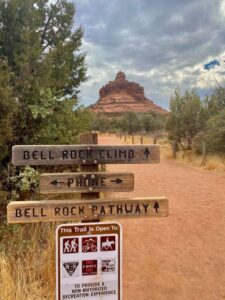
After the sunrise hike, head to Bell Rock (<10min from Cathedral Rock) for another hike that yields beautiful views. The climb up is about 2 miles and is similar to Cathedral Rock (straight up elevation). However, Bell Rock gives you options on how leisurely or strenuously you’d like to hike it. You can hike around a large portion of the perimeter, or hike straight up. The hike here is really whatever you want it to be – climb as high as you are comfortable and take any path that looks good to you. Bell Rock is a giant playground with multiple ways to get up and down! Side note, we debated doing a sunrise or sunset hike at another point on the trip, but never did. You should do it if it fits into your schedule at all!
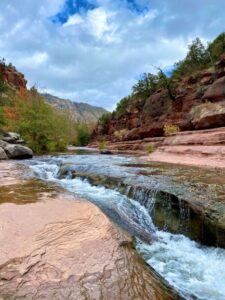
After this hike, drive to the Red Rock Crossing. This neat river crossing gives great views of Cathedral Rock in the distance. This is something you can cut out of the itinerary if you are running short on time.
Now it is time to take a break, grab some lunch, refuel and recharge. If your AirBnB is as awesome as ours, take a dip in your backyard hot tub and rest those legs – you have one final hike today – The Birthing Cave Hike!
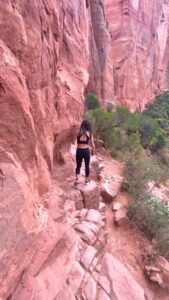
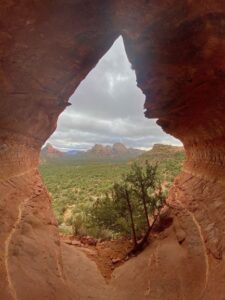
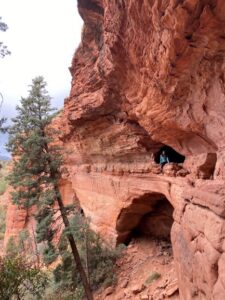
The birthing cave is a short and leisurely 2 mile hike roundtrip (out and back) near the Mescal Trail where you started the Devil’s Bridge hike. Park at Long Canyon Trailhead and head down the trail. You will hike the main trail for between 0.5 to 0.6 miles (about 15 minutes) when you come to a poorly marked fork – take the one to the left here. The easiest strategy is to set your phone/watch to track your distance, be on the lookout once you pass the half mile mark, then steer left at the next fork. Follow the trail in the direction of the rock facings – you can’t quite see the caves as you are approaching, but you can tell where they should be. See image below.
The last segment of the hike will be the most challenging, but your destination will be clear in sight. Once you near the cave, you will be able to see the opening and understand the name. Hopefully you get there and have it all to yourself. From inside, you can see beautiful views of the Sedona landscape. Climb up the sides for cool photo opportunities, there is even a “belly button” you can climb up and into. It is a little challenging to get in, but it offers the best view and best seat in the house. You will need a wide angle camera or a GoPro for the best pictures.

After completing this hike, hop in your rental car and drive north of Sedona to Slide Rock State Park. This location offers a place to swim and slide down natural smooth water slides along the river. It will likely be busy, so you may opt to walk up the river a little to take in the views instead. There is a parking fee of $20 to $30 depending on whether you come on the weekday or weekend, so definitely factor that in.
Now is a good time to call it a day, freshen up for dinner, and spend the rest of the evening relaxing in the hot tub. If you love sushi like we do, Hiro’s Sushi and Japanese Kitchen may be your dinner spot.
Now that you have reached the peaks of all the best hikes of Sedona, have seen the town from all vantage points, it is now time to hit the road to see what is nearby. Wake up, enjoy breakfast, and hit the road for the 3 hour drive to Page, Arizona to experience the iconic Horseshoe Bend, Antelope Canyon, and Lake Powell. (The southern rim of the Grand Canyon is also in this direction, but the geographic distance between it and Page makes it impossible to see all in one day)!
The route to Page takes you right past Sliding Rock State Park where you will be on Day 3, through a dozen hairpin turns, before reaching the highway headed for Flagstaff. Make sure when you are in Flagstaff, if you haven’t already, fuel up, have some good music downloaded, and have plenty of water and snacks for the longest haul of the drive. From Flagstaff on, it is a straight, unimpressive, and semi-abandoned drive, but what waits on the other side is without a doubt worth it.
Although not required, we recommend making advanced reservations at Antelope Canyon and planning your visit to Horseshoe Bend around that. First off, Antelope Canyon is operated by the Navajo Indian Tribe and the only way to see the canyons is by taking a guided tour with them. You can arrive without a reservation, but could waste valuable time and they will likely be booked. When we tried to go in November of 2020 (and as of March 2021), Antelope Canyons were closed due to COVID. Check their website periodically for updates.
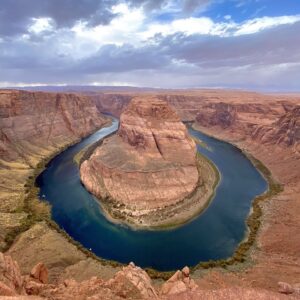
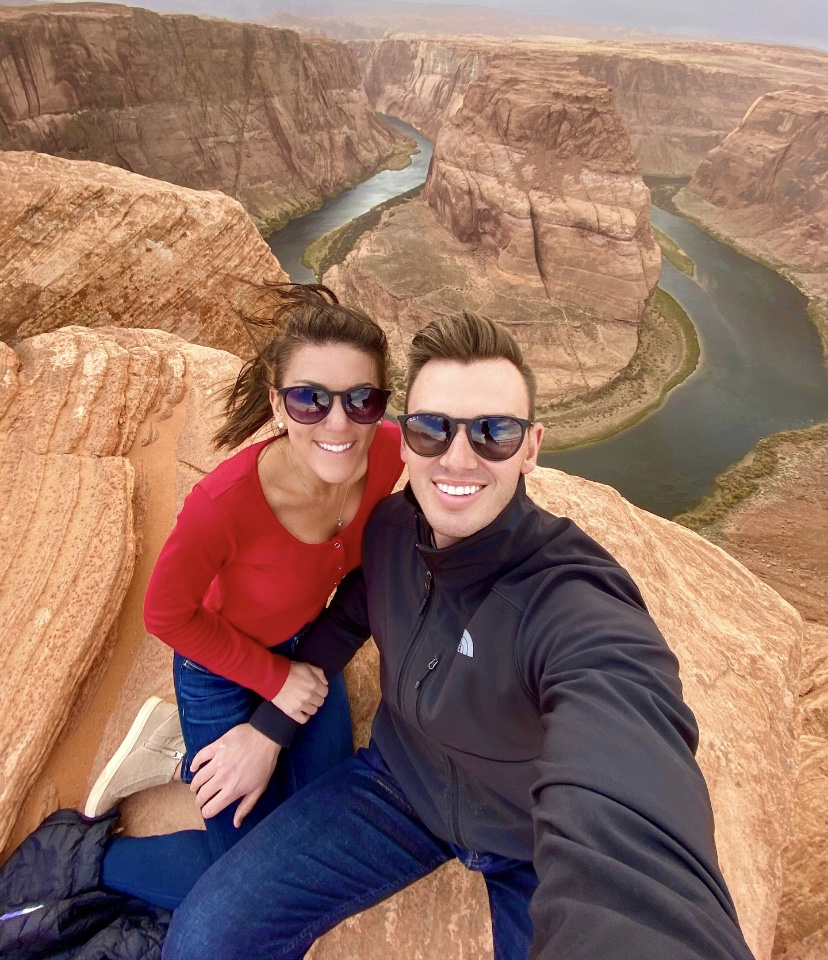
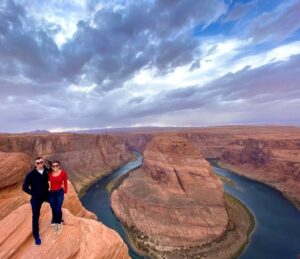
The second stop (or first depending on your Antelope Canyon reservation) is Horseshoe Bend. Everyone has seen the pictures and are in awe of the iconic view of the Colorado River meandering in the shape of a…horseshoe. However, it is impossible to prepare yourself for how deep, large, and impressive this natural structure is. When you arrive, right before making it to the town of Page, there is a gate and state parking lot just to the left of the highway – you can’t miss it. Parking at Horseshoe Bend costs $10. Here you can park your car, go to the restroom, and stretch your legs for the short easy 0.6 mile walk from the parking lot to Horseshoe Bend. Take your time, see Horseshoe Bend from every angle, after all, it is why you drove all this way.
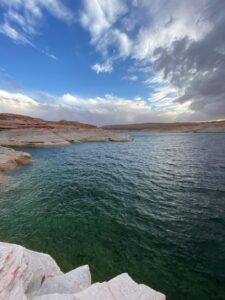
Now is the time to decide is Lake Powell, one of the most famous lakes in the US, on your must see list? If so, head 30 minutes north in the direction of the Lake Powell Marina. You can drive down to the edge of the boat access and see the rock walls feeding straight down into the water. Otherwise, now is the time to have a last bathroom break and head back south in the direction of Sedona.
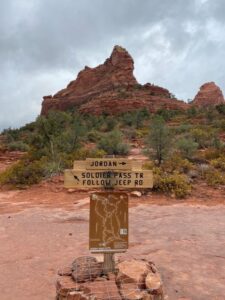
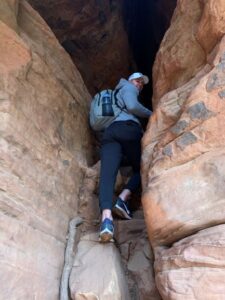
On your last day, you have an opportunity to do one more hike full of sites & adventure if you feel up for it – The Soldier’s Pass Hike (more detail on the Soldiers Pass Hike + a map here!). This 4.7 mile hike has many stops/sites along the way and you can do as much or as little as you want. Some of the highlights include Devil’s Kitchen (a massive sinkhole) , 7 Sacred Pools, and the Soldier’s Pass Arch. Parking will likely be an issue here. The parking lot has about 10-15 parking spots, and is tucked within a residential neighborhood that understandably doesn’t allow roadside parking. If it is full, the next closest lot is 0.5 miles up the road (you will pass it on the way in if you drive down to the trailhead parking lot), which will obviously add a little to the length of the total hike.
Parking Tip:
While we would never suggest hitch-hiking, if you are forced to park at the upper lot, consider flagging another fellow hiker down in their car. Chances are good they will try their luck in the lot at the trailhead. Ride with them, then when they realize they aren’t so lucky after all, have them drop you off and suggest they use the same strategy.
We chose to get there 30min before the parking lot gate opened at 8am to get in a car line for parking. Luckily we got a spot! Take the trail head and follow the signs to Soldiers Pass/Jeep Trail. You’ll quickly come up on the Devils Kitchen (0.2 miles), a remarkable sink hole that supposedly could get larger at any moment. Pressing on beyond that you will get to the well known Seven Sacred Pools after another 0.4 miles (0.6 miles from trailhead). The photos of these with the mountain range in the background are spectacular! But be forewarned, unless there has been substantial rainfall leading up to your trip, these sacred pools may be empty (like they were on our trip).
Soldiers Arch
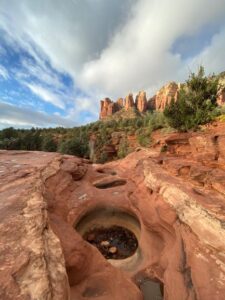
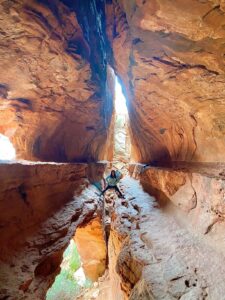
Beyond the Seven Sacred Pools, your next stop is Soldiers Arch. Be sure to save these directions/coordinates before the hike. Getting there can be tricky and we cannot tell you how many people asked for directions that had gotten lost when we were leaving the caves. Follow the Soldiers Pass Trail beyond the Seven Sacred Pools for another 0.6 miles (1.2 miles from trailhead), but do not be tempted by the numerous openings to the right that look like they may lead you there. Continue walking until you reach these coordinates, then turn right. There is no state/government sign directing you to this trail, instead it is often marked with sticks and logs by a good samaritan that likely passed by before you (see below).
Once on this section of the trail, you will end up on an open mesa, remain to the left. Now the trail is a straight shot to the cave/arch. The last section is a relatively steep climb, but keep your eye on the window in the cave. Walk right under it, then take the natural step passageway to the right up and inside the cave. This will give you access to the window you see in the rock face and the big crack on the inside.
It is a remarkable view, and if you are fortunate like we were you will have some time there by yourself to take in the serenity of it all. There are a couple options to press your luck and hike around the windows or into another cave, but do so at your own risk. We even saw a local take a daunting passage across the crack in the floor of the cave to the other side, up the steep rock steps/pile and up to the top (if you look closely behind Britt in the picture straddling the crack you can see the steepness of the wall). We have no idea where they ended up, but it was a passage that we were not prepared to do. So, we decided to turn back and return to the trail to conclude our last and final Sedona hike.
Word of advice: Do not spend much time at Devils Kitchen or Seven Sacred Pools on your way to the caves. The caves are best enjoyed alone or with fewer people. You will pass back by the Seven Sacred Pools and Devils Kitchen on your way out and can spend more time there then.
After the hike, head back to get your things, checkout, and drive back to Phoenix to catch your flight out of town. Congrats, you’ve just completed a spectacular 5 day Sedona itinerary. However, if you are looking for other destinations to tack on to the end of your trip or other locations to hike, hop on over to our other Western US Blogs. Or, if you’re simply looking for more hiking options, check out our other Hiking Blogs.